|
Commodore 64 - Raspberry Pi Upgrade |
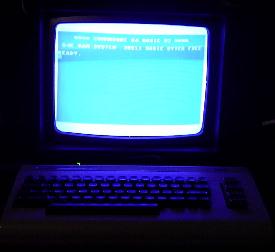
Bring back the c64 experience with just a c64 keyboard and shell. No more physical floppy drives or 5 1/4 inch disks!
My first real computer was a c64 purchased in 1985 but regrettably I sold all of my c64 hardware in a garage sale 10 years later. Almost 20 years since that bone-headed garage sale and I've finally found the perfect way to bring it back to life, and do it in a way that almost makes you forget that you're running it on an emulator!
Pi-c64
For classic gaming enthusiests!
Documented and Tested by John A. Reder - August 2014
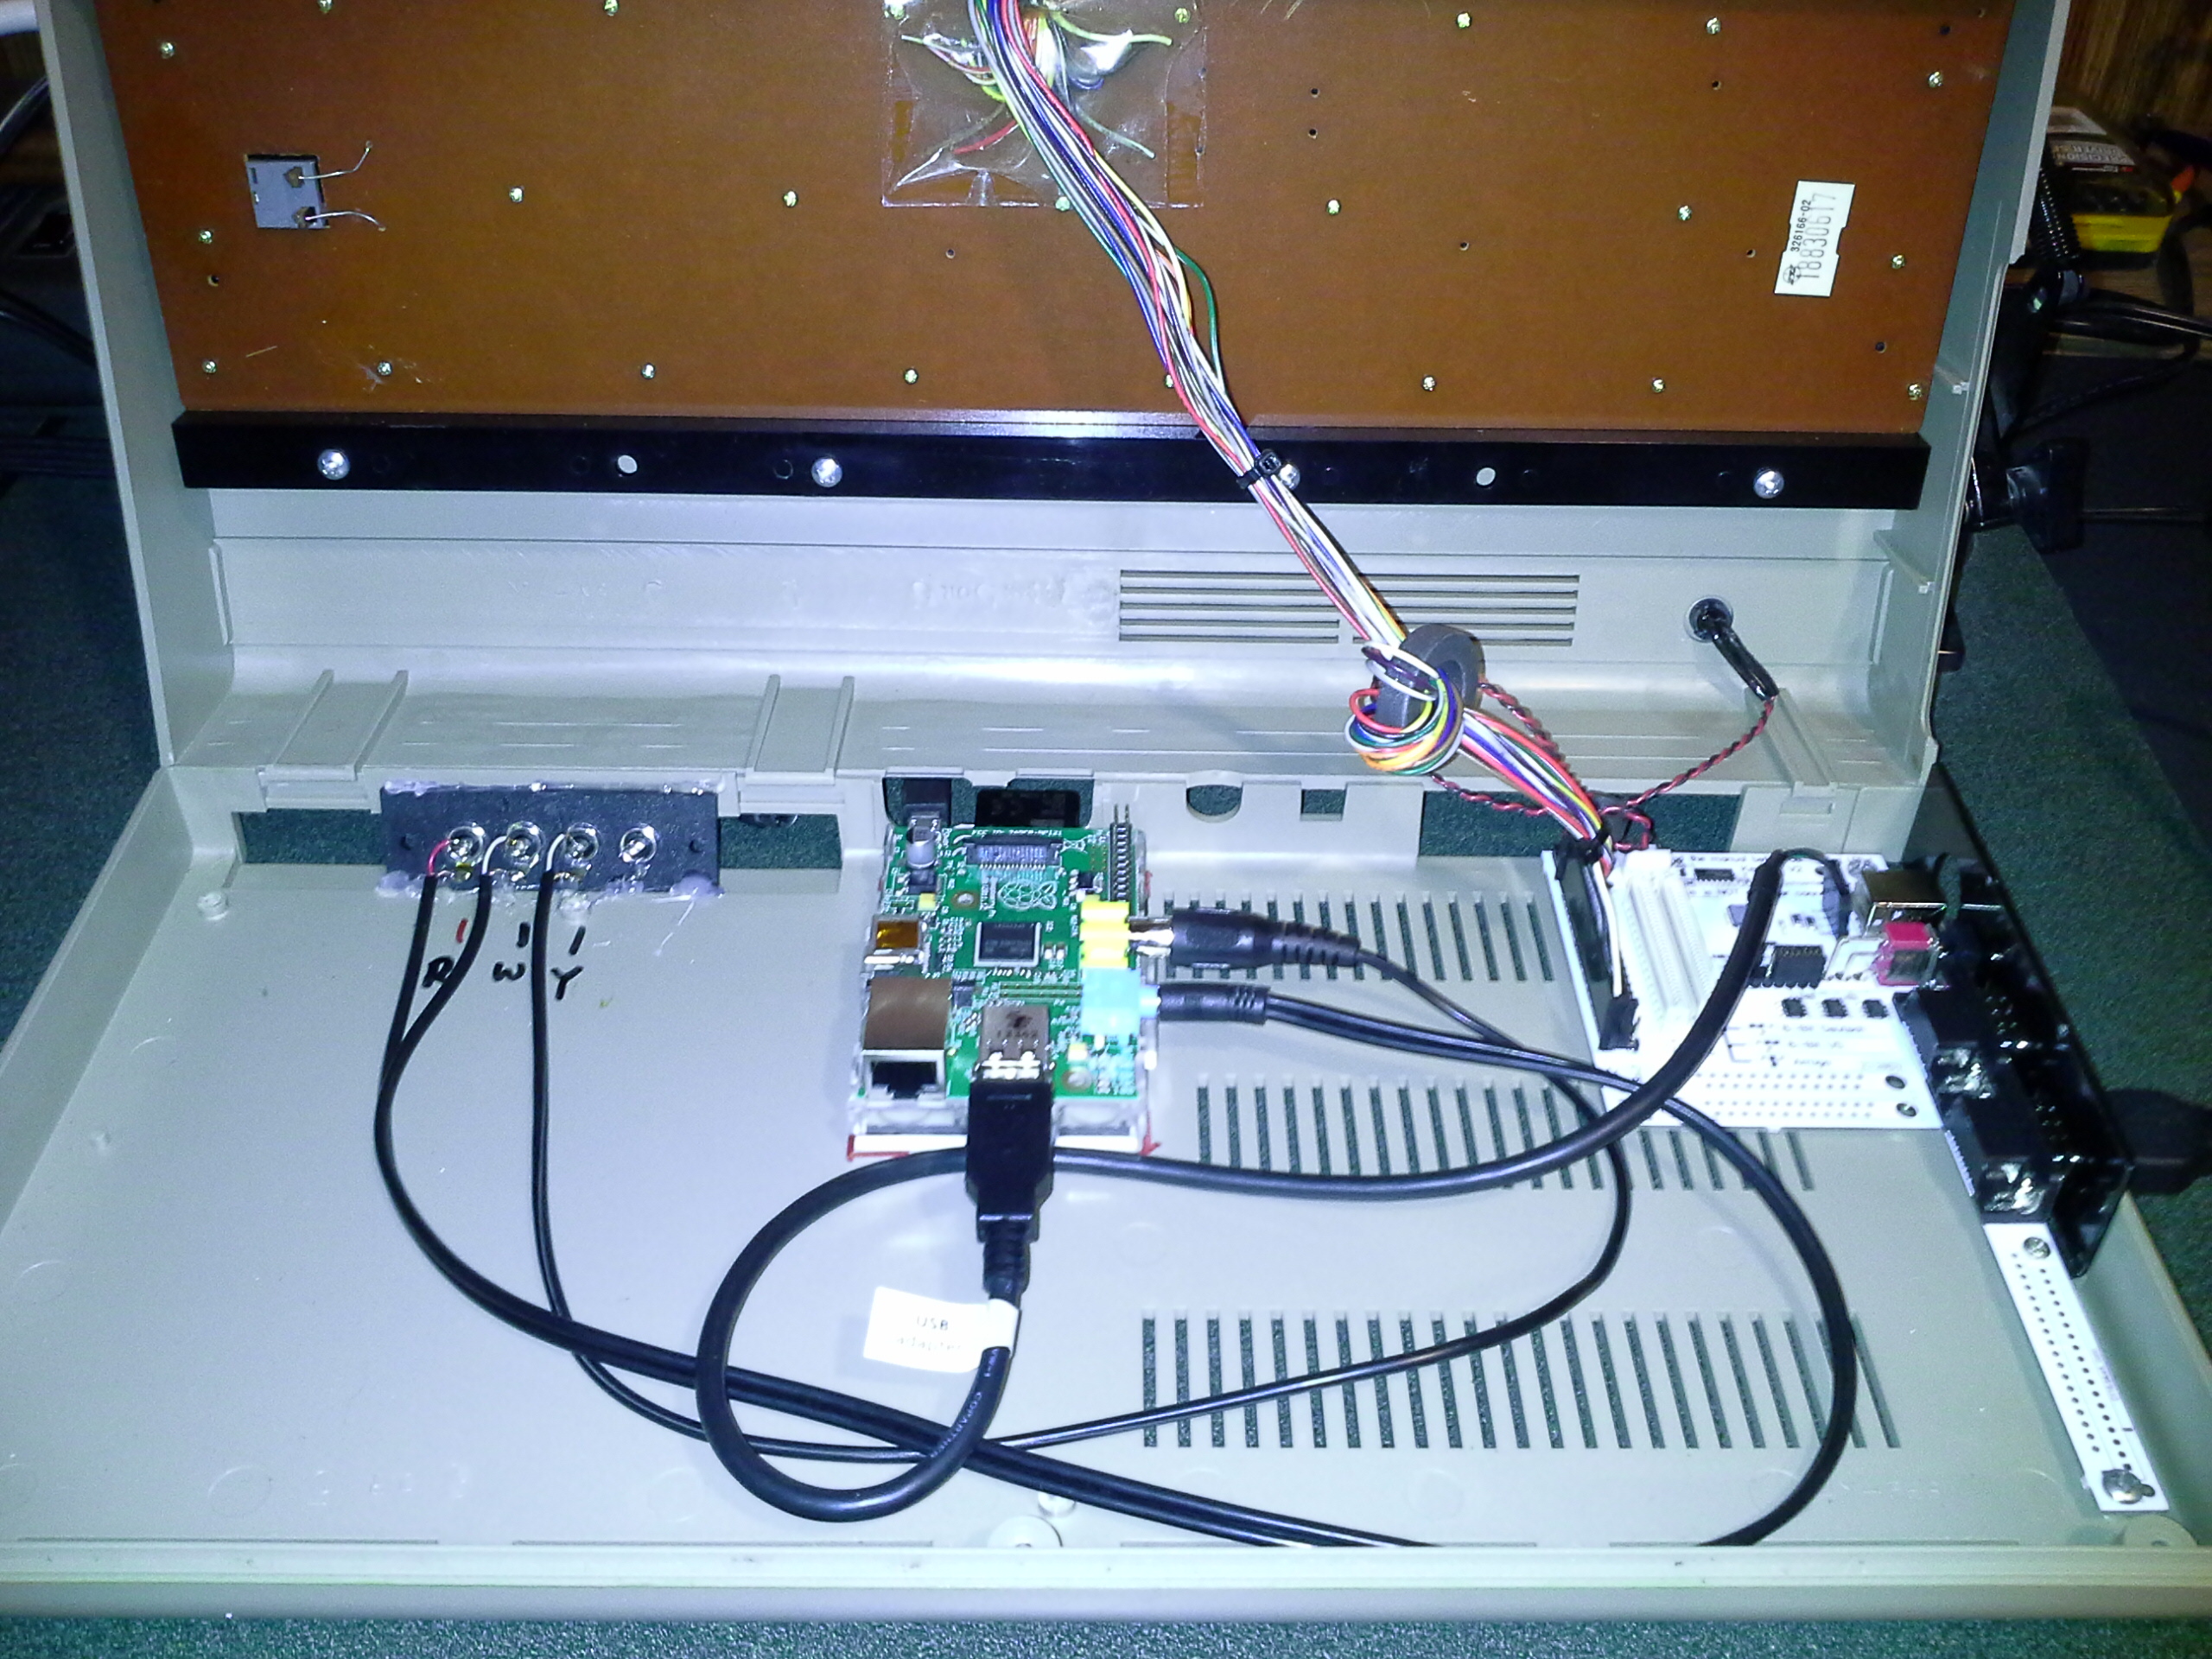
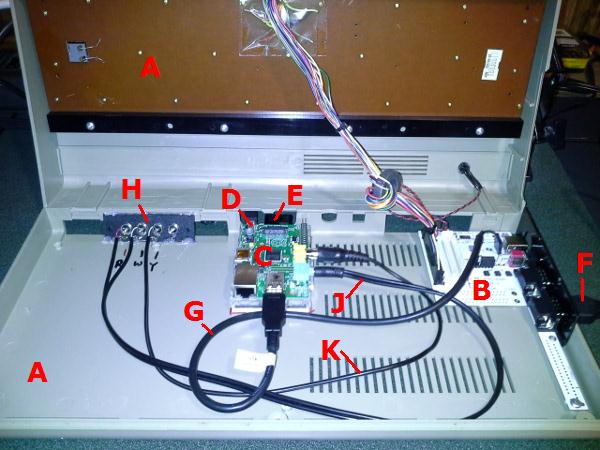
Hardware:
(A) 1 Classic c64 'Bread Box' style computer. (no other components power supply, disk etc. are necessary, even one with a bad motherboard will do, all you really care about is the keyboard and shell $10-20 on ebay for one in an unknown condition missing its power adapter.) - Remove the internal motherboard but keep the Keyboard and LED Cable and conectors and also the metal side joystick port panel. Other c64 models may work, but you're on you own... :)
(B) 1 Keyrah v2 (you do not need the external USB cable so you can select the cheaper one - see step G) (Keyrah Product Link)
(C) 1 Rasberry Pi (I used a model B) - easily fits into the c64. I mounted it with a bottom half of a Pi case and mounted it into place with that thick double sided 3M tape. A hot-Glue gun should also work well.
(D) 1 Rasberry Pi compatible 5v 1a AC adapter with a micro SD plug.
(E) 1 4GB SD card
(F) 1 standard Joystick from that era, I use one from an old Atari 2600.
(G) 1 USB internal extension cable. (I purchased it from a store called MicroCenter) - remember the black wire is ground when soldering it into place... :)
(H) 1 RCA 4 port jack Panel (I purchased it from Radio Shack - all you need are three ports but it could be cool to rewire the power adapter for the 4th one). I used a hot-glue gun to secure it into place.
(J) 1 3.5 audio jack cable that splits into the Right and Left (Red and White wires) channels (I purchased an audio jack to RCA ended Y connector and cut off the RCA ends to solder its wires to the Red and white jacks on the 4 port RCA panel.
(K) 1 RCA male ended cable (single signal wire. It was one of the RCA ends from the Y cable I cut off in step J above) I and soldered the wire end to the Video (yellow) RCA port on the 4 Port RCA panel.
Software:
Obtain the PiMAME image with VICE already installed. For this example I'm using PIMAME 0.7.10 (PiMAME.ORG Link)
1. I added this image to the 8GB SD card and booted it up on the Pi. Use a tool like Win32DiskImager.exe to write the image to your SD card from your PC.
2. I edited the /home/pi/.profile with the command to pipe the sound to the 3.5 audio port.
3. I edited the /home/pi/.profile so it no longer called the PiMAME menu and instead simply launched x64 to go directly into launching VICE (the C64 emulator). See tip 3 below for a more advanced approach. Also to force the sound out of the 3.5mm audio jack I inserted this line just before the x64 entry:
sudo amixer cset numid=3 1
4. I edited the /etc/init.d file to remark out he line out that executes the pimame movie at boot time. Boots faster and feels more like an actual c64 without the reminder that it is emuation.
#omxplayer /home/pi/pimameintro.mov
Configuration:
1. The Keyrah v2 has two modes, when you select the c64 emulation mode the red LED is lit on the top of the c64 keyboard.
2. Launch the VICE configuration screen by using a normal Keyboard and pressing F12. Since the Model B Pi lets you connect two USB devices, you can have both the Keyrah and the Normal keyboard connected at the same time.
3. Connect your joystick to the Keyrah (either port - I prefer the top one).
4. Select the configuration save settings option, then select the UI settings option, from here you can remap the keys needed to open and browse these setting menus to the joystick and I added the launch option to the pound key since I see no other real use for it :) I also mapped the cancel option to the left arrow key and the exit option to the Run/Stop key.
5. Once these are mapped you can go into the machine settings and map the joysticks using the joystick settings Define Keyset option, then enable the top joystick (Port 1) to keyset 1 and the bottom (Port 2) joystick to Keyset 2.
6. Go back to the top menu and select the save option and save the current configuration (the top option). You can also save settings as... name it settings1 (see hint 3 below)
7. Now you should be able to disconnect the standard keyboard and exclusively use the c64 keyboard and joystick to operate the emulator and its configuration menu.
8. Install your ROMS, I put them into the /user/pi/roms/c64 folder. Create a c64 sub folder in teh roms folder. To make this your default rom browsing folder see tip 3 below. You can use a FTP client to connect to your Pi to upload them (login pi, password raspberry).
9. You can now button up your c64 (3 screws on bottom) and its ready to play.
Hints:
1. To load a ROM use pound key to launch the config menu and select the top Autoloader option to browse to and select your desired ROM.
2. To increase load speed, use the drive settings menu to turn off Real Drive Emulation option.
3. If you save your settings to a file name you can edit your.profile to launch with the -config parameter pointing to your saved config file. Example for a config file saved as 'settings1' in the roms/c64 directory (also makes the default rom browse location /home/pi/roms/64):
sudo x64 -chdir roms/c64 -config roms/c64/settings1 # note you are starting from your '/home/pi' directory so teh paths are relative from there.
4. Its a good idea to backup your SD card using a tool like Win32DiskImager.exe and read it into a file on your PC.
5. The Pi cas a capacitor just behind the micro USB power adapter (C6) - be careful when plugging it in, it is easy to miss and break off this component if you miss the port. It isn't vital and the Pi will work without it for our purposes but if you have dirty power in your home, I'd suggest using a protective surge filtered power strip. Also it is simple to solder back on as it is surface mounted.
6. If you wish you can wire up a normally open (NO) reset button to the Pi as it has two holes on it to attach a 2 pin header or simply attach the wire tips to it. This is for advanced hackers and you can find out their exact location elsewhere on the internet. You can see that I added one in the video.
7. The 4 RCA female jack panel I used had no actual colors associated with the jacks. I used markers to add color to their default white plastic. The 4th I colored black with a permanent market for a possible power cable mode later.
8. I oriented the Pi so I can insert and remove the power and SD card once the case is put back together. I had to cut off some of the original plastic between the two c64 serial port holes to make a wide (pi friendly) single hole.
9. You can even add additional HDMI, 2nd USB and 4J45 extension cables for the other Pi ports if you wish, there's plenty of room in these older c64's. The case only has 3 screws, so I find it wasy to access them if I ever need to.
10. Looking for c64 ROMs? Try Here
|
|
 
Fortress of Flags

GameBoy Advance

Atari
Vectrex
Adventure Stidio
Retired Games
One-Switch
Home Arcade
Articles
|